前言
安裝完 k8s cluster 後,接著緊接下來要解決的問題就是 “資料儲存” 的問題。
由於 container 的生命周期跟 VM 不同,而且在 k8s cluster 上,container 可能會因為某些原因在不同的機器之間遷移,因此”資料儲存“這件事情就變得要謹慎考慮。
此篇文章將會介紹如何使用 Ceph RBD 為 k8s cluster 提供 block device 的 persistent volume。此外由於本文是著重在 k8s 與 Ceph 的整合,因此就不會再 k8s & Ceph 的安裝著墨,而是直接切入整合時的設定。
環境說明
Ceph: Luminous
Kubernetes:1.10.4
設定 Ceph cluster
首先要在 Ceph cluster 完成以下幾件事情:
建立一個給 k8s cluster 用的 pool (例如: kube)
設定 pool 相關參數 (replica 數量,Quota …. etc)
新增使用該 pool 的使用者帳號(例如: kube),並指定該 pool 的存取權限
接著我們透過以下指令完成上面的工作:(必須以 Ceph 管理者的權限進行設定)
1
2
3
4
5
6
7
8
9
10
11
12
13
14
15
16
17
18
19
20
21
|
$ ceph osd pool create kube 128
$ ceph osd pool set kube size 1
$ ceph osd pool set-quota kube max_bytes $((10 * 1024 * 1024 * 1024))
$ ceph auth get-or-create client.kube mon 'allow r' osd 'allow class-read object_prefix rbd_children, allow rwx pool=kube'
[client.kube]
key = [YOUR_KEY]
$ ceph auth get-key client.admin | base64
QVFEcytKaGF6UVlmRmhBQWJOZTNaZjYvaFVFdkhpRVVQejJOWFE9PQ==
$ ceph auth get-key client.kube | base64
QVFDTmp6RmJONy9wRkJBQUZxN3QzQnVLaTJpb2YwR0dDZEJ2dEE9PQ==
|
為了測試接下來要示範的 persistent volume,再多建立一個名稱為 ceph-image 的 RBD image:
rbd create kube/ceph-image –size 4096 –image-format 2 –image-feature layering
Ceph 預設的 Crush Map 設定會讓 k8s 與 Ceph 的整合發生問題,因此要先調整 Crush Map,詳情可以參考下方的障礙排除。
設定 Kubernetes
Prerequisite
由於在 mount Ceph RBD image 之前,kubelet 會檢查 image 的狀態,因此在 k8s worker node 都需要額外進行以下調整:
安裝 ceph-common 套件
將 ceph admin keyring 放到 /etc/ceph/ceph.keyring
獨立的 namespace
為了讓系統環境維持乾淨,接著建立一個獨立的 namespace(名稱為 ceph-rbd-pv-lab) 來進行以下測試:
1
2
3
4
5
|
$ kubectl create namespace ceph-rbd-pv-lab
$ kubectl config set-context $(kubectl config current-context) --namespace==ceph-rbd-pv-lab
|
使用 Ceph RBD 作為 Persistent Volume
準備檔案 ceph-pv.yaml,內容如下:
1
2
3
4
5
6
7
8
9
10
11
12
13
14
15
16
17
18
19
20
21
22
23
24
25
26
27
28
29
30
31
32
33
34
35
36
37
38
39
40
41
42
43
44
45
46
47
48
49
50
51
52
53
54
55
56
57
58
59
60
61
62
63
64
|
---
apiVersion: v1
kind: Secret
metadata:
name: ceph-secret-admin
data:
key: QVFEcytKaGF6UVlmRmhBQWJOZTNaZjYvaFVFdkhpRVVQejJOWFE9PQ==
---
apiVersion: v1
kind: PersistentVolume
metadata:
name: ceph-pv
spec:
capacity:
storage: 2Gi
accessModes:
- ReadWriteOnce
rbd:
monitors:
- 10.103.2.24:6789
pool: kube
image: ceph-image
user: admin
secretRef:
name: ceph-secret-admin
fsType: ext4
readOnly: false
persistentVolumeReclaimPolicy: Recycle
---
kind: PersistentVolumeClaim
apiVersion: v1
metadata:
name: ceph-claim
spec:
accessModes:
- ReadWriteOnce
resources:
requests:
storage: 2Gi
---
apiVersion: v1
kind: Pod
metadata:
name: ceph-pod1
spec:
containers:
- name: ceph-busybox
image: busybox
command: ["sleep", "60000"]
volumeMounts:
- name: ceph-vol1
mountPath: /usr/share/busybox
readOnly: false
volumes:
- name: ceph-vol1
persistentVolumeClaim:
claimName: ceph-claim
|
套用以上設定:
kubectl create -f ceph-pv.yaml
過一陣子檢查 pod 狀態:
1
2
3
4
5
6
7
8
|
$ kubectl get pod
NAME READY STATUS RESTARTS AGE
ceph-pod1 1/1 Running 0 2m
$ kubectl exec -it ceph-pod1 -- df -h | grep '/usr/share/busybox'
/dev/rbd0 3.8G 8.0M 3.6G 0% /usr/share/busybox
|
使用 StorageClass 動態生成 Persistent Volume
What’s StorageClass?
不曉得有沒有人想過以下問題:
而 Kubernetes StorageClass 就是以上問題的解答,其流程如下圖:
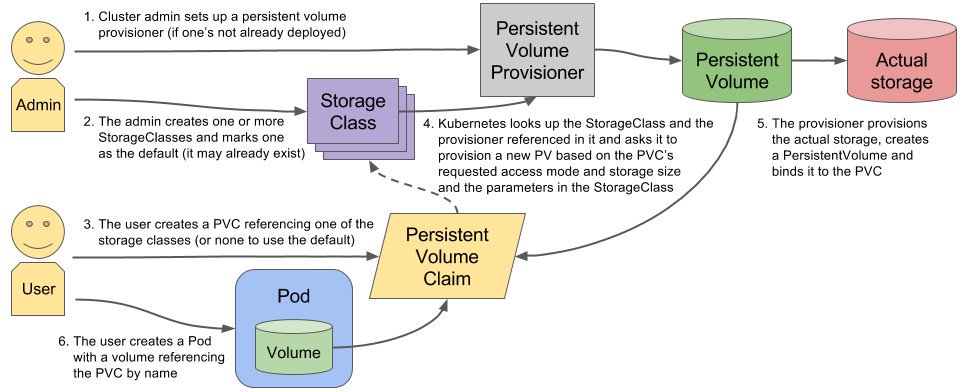
設定 persistent volume provisioner (Ceph RBD 已經被 k8s 支援)
k8s ckuster 管理者建立 Storage Class,並指定要使用的 PV provisioner(這裡使用 kubernetes.io/rbd)
使用者建立 PVC,指定要使用的 StorageClass
StorageClass 使用 provisioner 在實際的 storage 上產生 volume,並建立 PV 與其繫結
將 PV 與 使用者 PVC 進行繫結
使用者建立 pod,並使用 PVC 取得外部的儲存空間
以上的重點在於,管理者再也不用辛苦的手動建立儲存空間,並設定 PV 與其繫結了,這個部份都交給 StorageClass 自動處理
在 Kubernetes 上設定 StorageClass
準備以下設定檔,名稱為 ceph-storageclass.yml:
1
2
3
4
5
6
7
8
9
10
11
12
13
14
15
16
17
18
19
20
21
22
23
24
25
26
27
28
29
30
31
32
33
34
35
36
37
38
39
40
41
| ---
apiVersion: v1
kind: Secret
metadata:
name: ceph-secret-admin
namespace: kube-system
data:
key: QVFEcytKaGF6UVlmRmhBQWJOZTNaZjYvaFVFdkhpRVVQejJOWFE9PQ==
type: kubernetes.io/rbd
---
apiVersion: v1
kind: Secret
metadata:
name: ceph-secret-user
data:
key: QVFDTmp6RmJONy9wRkJBQUZxN3QzQnVLaTJpb2YwR0dDZEJ2dEE9PQ==
type: kubernetes.io/rbd
---
kind: StorageClass
apiVersion: storage.k8s.io/v1
metadata:
name: ceph-dynamic
annotations:
storageclass.beta.kubernetes.io/is-default-class: "true"
provisioner: kubernetes.io/rbd
parameters:
monitors: 10.103.2.24:6789
adminId: admin
adminSecretName: ceph-secret-admin
adminSecretNamespace: kube-system
pool: kube
userId: kube
userSecretName: ceph-secret-user
fsType: ext4
imageFormat: "2"
imageFeatures: "layering"
|
套用上述設定檔即可完成:
kubectl create -f ceph-storageclass.yml
從以上可以看出,其實 StorageClass 的內容就是在實際的 storage 進行操作所必要的資訊(包含 IP,帳號、密碼…..等等),敏感資訊的部份就透過 secret 放進去。
此外,在建立 StorageClass 的時候,就可以額外帶上建立 RBD 時的部份參數,以上面的設定為例,包含了:
如此一來當 RBD image 被建立時,就會是以在 StorageClass 中所定義的規格去產生。
驗證動態 Persistent Volume 的生成
接著來驗證 persistent volume 的自動生成,透過以下的設定(名稱為 storageclass-test.yml)來完成:
1
2
3
4
5
6
7
8
9
10
11
12
13
14
15
16
17
18
19
20
21
22
23
24
25
26
27
28
29
30
31
| ---
apiVersion: v1
kind: PersistentVolumeClaim
metadata:
name: ceph-pvc
spec:
accessModes:
- ReadWriteOnce
storageClassName: ceph-dynamic
resources:
requests:
storage: 2Gi
---
apiVersion: v1
kind: Pod
metadata:
name: ceph-pod1
spec:
containers:
- name: ceph-busybox
image: busybox
command: ["sleep", "60000"]
volumeMounts:
- name: ceph-vol1
mountPath: /usr/share/busybox
readOnly: false
volumes:
- name: ceph-vol1
persistentVolumeClaim:
claimName: ceph-pvc
|
1
2
3
4
5
6
7
8
9
10
11
12
13
14
15
16
17
18
19
20
21
22
23
24
25
26
27
28
29
30
31
32
|
$ kubectl create -f storageclass-test.yml
$ kubectl get pvc
NAME STATUS VOLUME CAPACITY ACCESS MODES STORAGECLASS AGE
ceph-pvc Bound pvc-426e7cc8-79b1-11e8-81d0-56277529c641 2Gi RWO ceph-dynamic 6s
$ kubectl get pods
NAME READY STATUS RESTARTS AGE
ceph-pod1 1/1 Running 0 20m
$ kubectl describe pv/pvc-426e7cc8-79b1-11e8-81d0-56277529c641
Name: pvc-426e7cc8-79b1-11e8-81d0-56277529c641
....(略)
StorageClass: ceph-dynamic
Status: Bound
Claim: ceph-rbd-pv-lab/ceph-pvc
....(略)
Source:
Type: RBD (a Rados Block Device mount on the host that shares a pod's lifetime)
CephMonitors: [10.103.2.24:6789]
RBDImage: kubernetes-dynamic-pvc-4273f5b9-79b1-11e8-9115-3a01c1a41f09
FSType: ext4
RBDPool: kube
RadosUser: kube
Keyring: /etc/ceph/keyring
SecretRef: &{ceph-secret-user }
ReadOnly: false
Events: <none>
|
可以看到有一個 RBD image kubernetes-dynamic-pvc-4273f5b9-79b1-11e8-9115-3a01c1a41f09 被產生出來。
接著回到 Ceph cluster 上查詢一下是不是有相對應的 object 被產生出來:
1
2
3
4
5
6
7
8
9
10
11
12
13
14
15
|
$ rbd -p kube ls
ceph-image
kubernetes-dynamic-pvc-4273f5b9-79b1-11e8-9115-3a01c1a41f09
$ rbd info kube/kubernetes-dynamic-pvc-4273f5b9-79b1-11e8-9115-3a01c1a41f09
rbd image 'kubernetes-dynamic-pvc-4273f5b9-79b1-11e8-9115-3a01c1a41f09':
size 2048 MB in 512 objects
order 22 (4096 kB objects)
block_name_prefix: rbd_data.bdce80238e1f29
format: 2
features: layering
flags:
create_timestamp: Wed Jun 27 10:24:46 2018
|
從上面 RBD image 的內容可以看出,StorageClass 的確是有幫我們根據上面的規格產生出一個 RBD image 與 PV,並相互繫結後,最後再與 PVC 繫結。
障礙排除
feature set mismatch (1)
在 pod event 中看到以下的訊息:
1
2
3
4
5
6
| MountVolume.WaitForAttach failed for volume "ceph-pv" : rbd: map failed exit status 110, rbd output: 2018-06-26 05:44:18.264219 7f50a90e4100 -1 did not load config file, using default settings.
rbd: sysfs write failed
In some cases useful info is found in syslog - try "dmesg | tail" or so.
rbd: map failed: (110) Connection timed out
|
於是到 worker node 上執行 dmesg,看到了很多類似以下的訊息:
1
2
3
4
| ........ (略)
libceph: mon0 10.103.2.24:6789 feature set mismatch, my 106b84a842a42 < server's 40106b84a842a42, missing 400000000000000
libceph: mon0 10.103.2.24:6789 missing required protocol features
........ (略)
|
解決方法
這個問題只要修改 Ceph 的 crush map 即可,修改的方式到 Ceph 的 admin node 上執行以下指令:
1
2
3
| $ ceph osd crush tunables legacy
$ ceph osd crush reweight-all
|
其實也可以將 kernel 升級到 4.5 以上解決此問題
feature set mismatch (2)
這個問題同樣是 feature set mismatch,會出現以下訊息:
1
2
| rbd: sysfs write failed
RBD image feature set mismatch. You can disable features unsupported by the kernel with "rbd feature disable".
|
這個問題需要在建立 RBD image 時就要設定好特定的 feature,因此回到 Ceph admin node 上,先以正常的方式建立 RBD image
1
2
3
4
5
6
7
8
9
10
11
12
13
|
$ rbd create kube/ceph-image --size 1024
$ rbd info kube/ceph-image
rbd image 'ceph-image':
size 1024 MB in 256 objects
order 22 (4096 kB objects)
block_name_prefix: rbd_data.ba3aa02ae8944a
format: 2
features: layering, exclusive-lock, object-map, fast-diff, deep-flatten
flags:
create_timestamp: Tue Jun 26 14:08:35 2018
|
其中 exclusive-lock, object-map, fast-diff, deep-flatten 這些 feature 都要拿掉才行….
因此我們改成以下指令建立 RBD image:
rbd create kube/ceph-image –size 1024 –image-format 2 –image-feature layering
上面的問題就解決了!
References