安裝 Helm
因為我自己用 Ubuntu,所以以下就紀錄 Ubuntu 環境中安裝 Helm 的方式:
1
2
3
4
5
6
7
8
9
| $ curl https://baltocdn.com/helm/signing.asc | sudo apt-key add -
$ sudo apt-get install apt-transport-https --yes
$ echo "deb https://baltocdn.com/helm/stable/debian/ all main" | sudo tee /etc/apt/sources.list.d/helm-stable-debian.list
$ sudo apt-get update
$ sudo apt-get -y install helm
|
其他環境的安裝方式可以參考 Helm 官方安裝文件
Getting Started
Chart 基本結構
Helm chart 是在 Helm 的整體架構中被用來佈署的單位,用 chart 佈署到 k8s 後的產出,稱為 release 或是 released object。
因此 Helm chart 其實就是 k8s 那一堆 API object 的定義 + templating 功能,而衍生來可以管理 k8s workload 發佈的工具,因此先來了解一下 Helm chart 的結構如下:(假設名稱為 mychart)
1
2
3
4
5
6
| mychart/
Chart.yaml
values.yaml
charts/
templates/
...
|
templates/:此目錄顧名思義就是存放 template 檔案的位置,佈署時整個目錄會送交到 template rendering engine(目前架構中由 Helm Library 負責此項工作),搭配其他傳入參數後,產生結果後送給 k8s API server
values.yaml:此檔案包含了 templates/ 目錄中的檔案中所需要的預設值,可讓使用者可以透過 helm install 或是 helm upgrade 來 override,進而產生出不同的 release 內容
charts/:此目錄可能包含了其他不同的 chart,也可稱為 subcharts
Chart.yaml:此檔案包含了 chart 的內容描述
請注意目錄 & 檔案名稱有大小寫之分
快速產生 chart template
由於 Helm client 可以協助產生 chart skeleton,因此可以透過以下指令很快的產生出一個範本:
helm create mychart
接著就會出現以下的檔案結構:
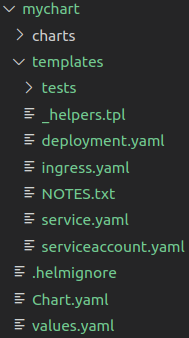
除了上面提到的幾個重要檔案 & 目錄之外,在 templates/ 目錄中多了很多檔案,例如:
NOTES.txt:chart 本身的 help text,當使用者執行 helm install 時會顯示
deployment.yaml:建立 k8s deployment 的基本樣板
service.yaml:建立 k8s service 的基本樣板
_helpers.tpl:用來產生 help 資訊的基本樣板
建立新的 namespace 進行開發測試
首先建立一個新的 namespace 來進行後續的開發測試:
1
2
3
4
5
6
7
8
9
10
11
12
13
|
$ kubectl config get-contexts
CURRENT NAME CLUSTER AUTHINFO NAMESPACE
* my-vsphere-cluster my-vsphere-cluster my-vsphere-cluster
my-vsphere-cluster-rancher-k8s-master-1 my-vsphere-cluster-rancher-k8s-master-1 my-vsphere-cluster
my-vsphere-cluster-rancher-k8s-master-2 my-vsphere-cluster-rancher-k8s-master-2 my-vsphere-cluster
my-vsphere-cluster-rancher-k8s-master-3 my-vsphere-cluster-rancher-k8s-master-3 my-vsphere-cluster
$ kubectl create ns/helm-test
$ kubectl config set-context my-vsphere-cluster --namespace=helm-test
|
建立第一個 template
首先為了讓事情簡單點,先移除 templates/ 目錄中的所有內容,並建立以下檔案:(templates/configmap.yaml)
1
2
3
4
5
6
7
| apiVersion: v1
kind: ConfigMap
metadata:
name: {{ .Release.Name }}-configmap
data:
myvalue: "Hello World"
|
開發 chart 時,檔案的副檔名規則,建議若是 YAML 使用 .yaml,若是 help 資訊相關的則用 .tpl
接著執行安裝 Helm chart 的動作:
1
2
3
4
5
6
7
| $ helm install clunky-serval ./mychart
NAME: clunky-serval
LAST DEPLOYED: Sat Mar 21 20:22:23 2020
NAMESPACE: default
STATUS: deployed
REVISION: 1
TEST SUITE: None
|
接著可以用以下指令檢視 release 的詳細內容 & 實際上佈署到 k8s 的設定:
1
2
3
4
5
6
7
8
9
10
11
12
13
14
|
$ kubectl get configmap
NAME DATA AGE
clunky-serval-configmap 1 10s
$ helm get manifest clunky-serval
---
apiVersion: v1
kind: ConfigMap
metadata:
name: clunky-serval-configmap
data:
myvalue: "Hello World"
|
若 chart 中多個 k8s API object 的定義,上面就會一併顯示出來
最後執行移除 chart 的指令:
1
2
| $ helm uninstall clunky-serval
release "clunky-serval" uninstalled
|
此外,若是希望可以檢視準備要安裝的 chart 內容再決定是否安裝,可執行以下指令,透過 template 產生出預計會安裝到 k8s 的內容:
1
2
3
4
5
6
7
8
9
10
11
12
13
14
15
16
17
18
|
$ helm install --dry-run goodly-guppy ./mychart
NAME: goodly-guppy
LAST DEPLOYED: Sat Mar 21 20:27:45 2020
NAMESPACE: default
STATUS: pending-install
REVISION: 1
TEST SUITE: None
HOOKS:
MANIFEST:
---
apiVersion: v1
kind: ConfigMap
metadata:
name: goodly-guppy-configmap
data:
myvalue: "Hello World"
|
透過 --dry-run 可以檢視準備要安裝到 k8s 的內容,但卻不會進行真正的安裝,在開發 chart 時是個非常好用的功能。
Built-in Objects
Object 是在 template engine 中傳遞給 template,產生出最終結果用的;而 Helm 提供了很多可程式化的方式來產生 object。
以上面的範例來說,就是使用了 Release object 中的 Name 屬性(官方文件中依然將 Name 視為 object),因此透過 {{ .Release.Name }} 的方式就可以變更 configmap 的名稱。
以下介紹幾個內建的 object:(以下內建的 object 都是以大寫字母開頭命名,自訂物件可不用按照此規則)
Release
很直觀的,Release object 其實就是描述 release 本身,包含了像是 Release.Name, Release.Namespace, Release.IsUpgrade, Release.IsInstall, Release.Revision, Release.Service…等屬性(or object)。
Values
這個 object 的值則是直接來自於使用者佈署時所傳入的 values.yaml 檔案內容;若是沒有傳入 values.yaml,那 Values 這個 object 就不會有任何內容。
Chart
這個 object 的內容來自於檔案 Chart.yaml 中所定義的內容,例如:Chart.Name & Chart.Version
Files
Files object 是用來協助存取上述特殊檔案以外的檔案,舉例來說:
Files.Get:可用來取得指定路徑的檔案
Files.GetBytes:從檔案中取得 binary 的內容,通常用來處理像是 image 這一類的檔案
Files.Lines:可以針對檔案內容一行一行的逐行讀取,常用來以 line 為單位進行處理時使用
Files.AsSecrets:讀取檔案內容後,轉成以 Base 64 編碼後的內容
Files.AsConfig:將檔案內容轉換成 YAML map 物件
Capabilities
此物件用來提供目前 k8s cluster 所具備的功能範圍資訊,例如:Capabilities.APIVersions, Capabilities.APIVersions.Has $version, Capabilities.KubeVersion, Capabilities.KubeVersion.Major, Capabilities.KubeVersion.Minor … 等資訊。
Template
此物件提供目前執行中的 template 所包含的訊息,例如:
Values 檔案的使用方式
標準使用方式
透過傳遞 Values 檔案的內容,使用者可以根據需求改變 Helm chart 產生出的內容,將正確的內容佈署到 k8s 上,而 Values 檔案在套用上的順序,會按照以下的順序來套用:(越下方的優先權越高)
chart 中所包含的 values.yaml 檔案
若有 subchart,則會套用來自 parent chart 的 values.yaml
使用 helm install -f or helm upgrade -f 時指定的檔案,例如:helm install -f myvals.yaml ./mychart
透過 --set 傳入的單獨參數,例如:helm install --set foo=bar ./mychart
以上面的範例來說,建立檔案 mychart/values.yaml,內容如下:
1
2
3
| favorite:
drink: coffee
food: pizza
|
mychart/templates/configmap.yaml 的內容則調整如下:
1
2
3
4
5
6
7
8
| apiVersion: v1
kind: ConfigMap
metadata:
name: {{ .Release.Name }}-configmap
data:
myvalue: "Hello World"
drink: {{ .Values.favorite.drink }}
food: {{ .Values.favorite.food }}
|
以下則是實際用法說明:
1
2
3
4
5
6
7
8
9
10
11
12
13
14
15
16
17
18
19
20
21
22
23
24
25
26
27
28
29
30
31
32
33
34
35
36
37
38
39
40
41
42
|
$ $ helm install --dry-run good-puppy ./mychart
NAME: good-puppy
LAST DEPLOYED: Sun Mar 22 20:28:11 2020
NAMESPACE: default
STATUS: pending-install
REVISION: 1
TEST SUITE: None
HOOKS:
MANIFEST:
---
apiVersion: v1
kind: ConfigMap
metadata:
name: good-puppy-configmap
data:
myvalue: "Hello World"
drink: coffee
food: pizza
$ $ helm install --dry-run --set favorite.drink=slurm good-puppy ./mychart
NAME: good-puppy
LAST DEPLOYED: Sun Mar 22 20:29:16 2020
NAMESPACE: default
STATUS: pending-install
REVISION: 1
TEST SUITE: None
HOOKS:
MANIFEST:
---
apiVersion: v1
kind: ConfigMap
metadata:
name: good-puppy-configmap
data:
myvalue: "Hello World"
drink: slurm
food: pizza
|
若要刪除 default key
待測試…..
Template Functions and Pipelines
此部份介紹如何根據實際需求,將傳入到 template 的值再進行額外的加工;而 Helm 提供了超過六十種的 function 可供使用者處理資料,這些 function 來自於以下兩個地方:
以下舉個簡單例子:
1
2
3
4
5
6
7
8
9
| apiVersion: v1
kind: ConfigMap
metadata:
name: {{ .Release.Name }}-configmap
data:
myvalue: "Hello World"
drink: {{ quote .Values.favorite.drink }}
food: {{ quote .Values.favorite.food }}
|
Pipelines
pipeline 是來自於 Unix 的概念,在 templating language 是時常被用到的功能,可將多個 function 同時混搭使用,例如:
1
2
3
4
5
6
7
8
9
10
| apiVersion: v1
kind: ConfigMap
metadata:
name: {{ .Release.Name }}-configmap
data:
myvalue: "Hello World"
drink: {{ .Values.favorite.drink | repeat 5 | quote }}
food: {{ .Values.favorite.food | upper | quote }}
|
以下是上述範例的輸出結果:
1
2
3
4
5
6
7
8
9
10
11
12
13
14
15
16
17
18
19
| $ helm install --dry-run good-puppy ./mychart/
NAME: good-puppy
LAST DEPLOYED: Mon Mar 23 04:38:51 2020
NAMESPACE: default
STATUS: pending-install
REVISION: 1
TEST SUITE: None
HOOKS:
MANIFEST:
---
apiVersion: v1
kind: ConfigMap
metadata:
name: good-puppy-configmap
data:
myvalue: "Hello World"
drink: "coffeecoffeecoffeecoffeecoffee"
food: "PIZZA"
|
Flow Control
flow control 同樣也是 templating language 中的一個重要功能,而 Helm 提供了 if/else, with, range … 等功能,若有對程式開發有經驗的人,看到上述的關鍵字應該可以很容易的理解。
此外,還有其他特別的功能,像是:
if/else
在以下的情況下,會被 template engine 判定為 false:
boolean 值,false
數字,0
空白字串
nil (空白字串 or null)
空集合(map, slice, tuple, dict, array)
其他情況則都會被判定為 true。
以下是個簡單範例:
1
2
3
4
5
6
7
8
9
| apiVersion: v1
kind: ConfigMap
metadata:
name: {{ .Release.Name }}-configmap
data:
myvalue: "Hello World"
drink: {{ .Values.favorite.drink | default "tea" | quote }}
food: {{ .Values.favorite.food | upper | quote }}
{{ if eq .Values.favorite.drink "coffee" }}mug: true{{ end }}
|
會得到下方結果:
1
2
3
4
5
6
7
8
9
10
11
12
13
14
15
16
17
18
19
20
| $ helm install --dry-run good-puppy ./mychart/
NAME: good-puppy
LAST DEPLOYED: Mon Mar 23 05:15:03 2020
NAMESPACE: default
STATUS: pending-install
REVISION: 1
TEST SUITE: None
HOOKS:
MANIFEST:
---
apiVersion: v1
kind: ConfigMap
metadata:
name: good-puppy-configmap
data:
myvalue: "Hello World"
drink: "coffee"
food: "PIZZA"
mug: true
|
處理空白字元
仔細看上面的範例,在 if 那一行看起來就很不習慣,如果改成下面這樣寫法肯定更容易的看懂:
1
2
3
4
5
6
7
8
9
10
11
| apiVersion: v1
kind: ConfigMap
metadata:
name: {{ .Release.Name }}-configmap
data:
myvalue: "Hello World"
drink: {{ .Values.favorite.drink | default "tea" | quote }}
food: {{ .Values.favorite.food | upper | quote }}
{{ if eq .Values.favorite.drink "coffee" }}
mug: true
{{ end }}
|
但這樣會造成以下結果:
1
2
3
4
5
6
7
8
9
10
11
12
13
14
15
16
17
18
19
20
21
| $ helm install --dry-run good-puppy ./mychart/
NAME: good-puppy
LAST DEPLOYED: Mon Mar 23 05:16:52 2020
NAMESPACE: default
STATUS: pending-install
REVISION: 1
TEST SUITE: None
HOOKS:
MANIFEST:
---
apiVersion: v1
kind: ConfigMap
metadata:
name: good-puppy-configmap
data:
myvalue: "Hello World"
drink: "coffee"
food: "PIZZA"
mug: true
|
結果中間出現了一個空白行,雖然可以正常使用但就是不太好看;幸好 Helm 提供了解決方法:
1
2
3
4
5
6
7
8
9
10
11
| apiVersion: v1
kind: ConfigMap
metadata:
name: {{ .Release.Name }}-configmap
data:
myvalue: "Hello World"
drink: {{ .Values.favorite.drink | default "tea" | quote }}
food: {{ .Values.favorite.food | upper | quote }}
{{- if eq .Values.favorite.drink "coffee" }}
mug: true
{{- end }}
|
透過在 if & else 前方加上一個 dash -,就會出現一開始的結果囉!
透過 “with” 關鍵字來限定變數範圍
有時候當 value 的階層很多時,透過 with 關鍵字就可以讓 template 內容再更簡潔一點,例如:
1
2
3
4
5
6
7
8
9
10
11
12
| apiVersion: v1
kind: ConfigMap
metadata:
name: {{ .Release.Name }}-configmap
data:
myvalue: "Hello World"
{{- with .Values.favorite }}
drink: {{ .drink | default "tea" | quote }}
food: {{ .food | upper | quote }}
{{- end }}
release: {{ .Release.Name }}
|
使用 “range” 走訪指定物件的所有元素
range的用法就跟程式語言中的 foreach 是相同的,以下是個範例:
1
2
3
4
5
6
7
8
9
10
11
12
13
14
15
16
17
18
19
20
| apiVersion: v1
kind: ConfigMap
metadata:
name: {{ .Release.Name }}-configmap
data:
myvalue: "Hello World"
{{- with .Values.favorite }}
drink: {{ .drink | default "tea" | quote }}
food: {{ .food | upper | quote }}
{{- end }}
toppings: |-
{{- range $index, $topping := .Values.pizzaToppings }}
- {{ . | title | quote }}
{{- end }}
sizes: |-
{{- range tuple "small" "medium" "large" }}
- {{ . }}
{{- end }}
|
1
2
3
4
5
6
7
8
9
10
11
12
13
14
15
16
17
18
19
20
21
22
23
24
25
26
27
28
29
|
$ helm install --dry-run good-puppy ./mychart/
NAME: good-puppy
LAST DEPLOYED: Wed Mar 25 05:18:48 2020
NAMESPACE: default
STATUS: pending-install
REVISION: 1
TEST SUITE: None
HOOKS:
MANIFEST:
---
apiVersion: v1
kind: ConfigMap
metadata:
name: good-puppy-configmap
data:
myvalue: "Hello World"
drink: "coffee"
food: "PIZZA"
toppings: |-
- "Mushrooms"
- "Cheese"
- "Peppers"
- "Onions"
sizes: |-
- small
- medium
- large
|
而 range 可以處理的資料結構其實有不少,除了像是一般的 tuple & list 之外,其他像是 key/value 結構的 map & dict 也都是支援的。
Variables
scoped variable
variable 的概念其實跟一般程式語言中的變數並無不同,其實就是將特定的值塞入變數中,並在後續的程式中使用,以下是從上面改造的範例:
1
2
3
4
5
6
7
8
9
10
11
12
13
14
15
16
17
18
19
20
21
22
23
24
25
| apiVersion: v1
kind: ConfigMap
metadata:
name: {{ .Release.Name }}-configmap
data:
myvalue: "Hello World"
{{- $relname := .Release.Name }}
{{- range $key, $val := .Values.favorite }}
{{ $key }}: {{ $val | quote }}
{{- end }}
rlease: {{ $relname }}
rlease: {{ $relname }}
toppings: |-
{{- range $index, $topping := .Values.pizzaToppings }}
{{ $index }} {{ $topping | title | quote }}
{{- end }}
sizes: |-
{{- range tuple "small" "medium" "large" }}
- {{ . }}
{{- end }}
|
global variable (待補)
Named Templates
named template 跟前面看到一般的 template 是不太一樣的,具有以下幾個特性:
其他待補……
References