0%

[Docker] Bridge Network 簡介

此篇文章介紹 Docker Bridge Network 及其運作方式

環境介紹

以下的測試將會在以下環境進行:

  • OS:Ubuntu 18.04

  • Docker: 18.03.1-ce

檢視目前 Docker Network 狀態

以下是在 Ubuntu 18.04 上剛安裝好 docker 18.03.1 後的 docker network 狀態:

1
2
3
4
5
$ docker network ls
NETWORK ID NAME DRIVER SCOPE
a1c7b6f80389 bridge bridge local
dc2f51e1056f host host local
f28460d3a620 none null local

從上面可以看出,剛安裝好 docker 的 Linux 主機,會預設帶有 3 個 driver,分別就是 bridgehost 以及 null

接著以下將會仔細的介紹一下 bridge network 的運作方式。

Overview

先來個 Docker Bridge Network 的觀念釋疑:

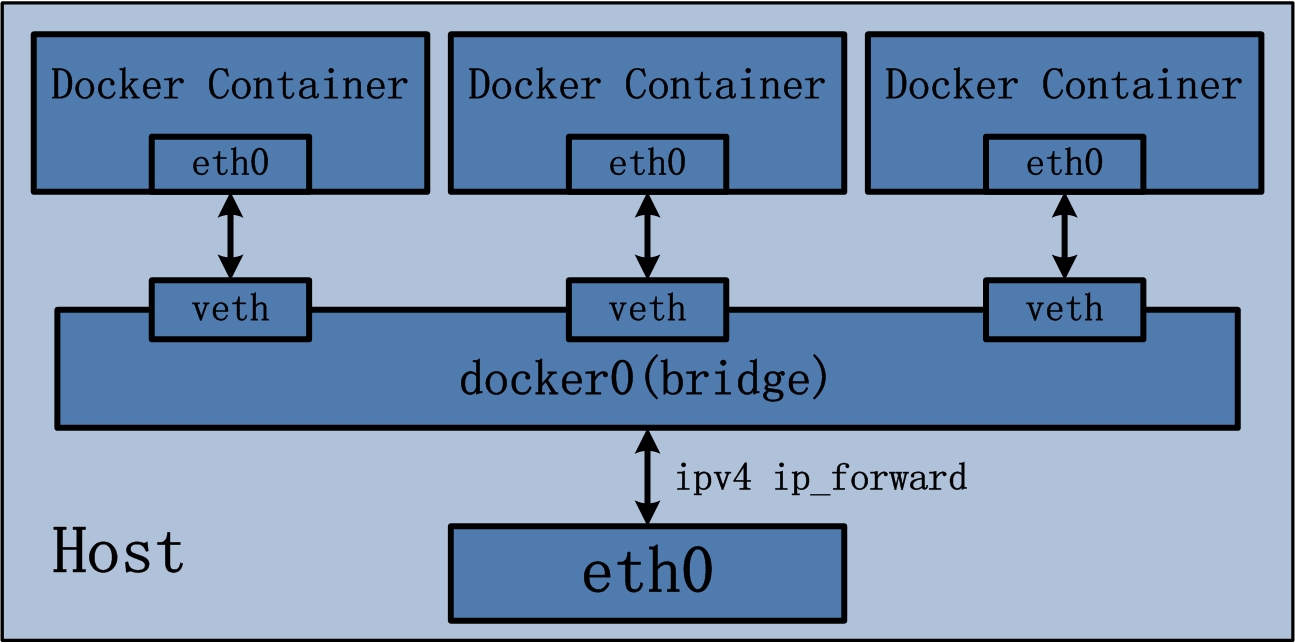
  • bridge network 其實是利用的是 Docker Host 上的 software bridge 來達成讓 container 可以連外的目的,並透過此 bridge 可以讓同一個 bridge 的 container 之間相互進行通訊;而且 docker bridge driver 會自動在 Host 上設定相對應的 rule(iptables, network namespace),讓 container 的網路可以正確的被使用。

  • bridge network 是處理在單一 docker daemon 上運行的 container 之間的相互通訊,若是要處理多個 docker daemon 上的 container 通訊,則必須要使用 overlay network

下圖是 bridge network 的架構

docker bridge network

使用預設的 Bridge Network (docker0)

安裝好 docker 後,其實 docker 就為我們準備好了一個 bridge docker0 用來當作 container 的對外 software bridge,以下的範例會先使用 docker0 來做示範。

建立 container

首先先建立所需要的 container 並檢視網路狀態:

1
2
3
4
5
6
7
8
9
10
11
12
13
14
15
16
17
18
19
20
21
22
23
24
25
26
27
28
29
30
31
32
33
34
35
36
37
38
39
40
41
42
43
44
45
46
47
48
49
50
51
52
53
54
55
56
57
58
59
60
61
62
63
64
65
66
67
68
69
70
71
72
73
# 啟動 alpine linux container 1 (alpine1)
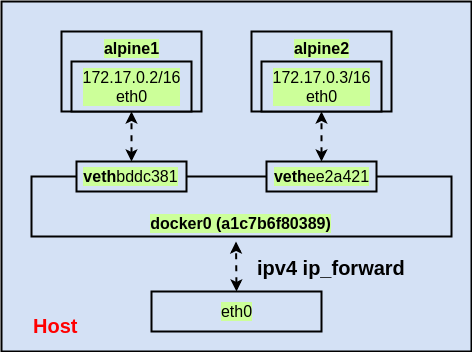
$ docker run -dit --name alpine1 alpine ash
b75464efd30bf09e118450de2abaeb35549e732bac5805671f1e6e97cd970897

# 啟動 alpine linux container 2 (alpine2)
$ docker run -dit --name alpine2 alpine ash
16aa4a102b14de3e151cb5e19522925bb4e143034d5b2aac4ce239c79716b703

# 檢視目前 software bridge status (需安裝 bridge-utils 套件)
$ brctl show
bridge name bridge id STP enabled interfaces
docker0 8000.024284431eec no vethbddc381
vethee2a421

# 檢視 docker bridge network 狀態
$ docker network inspect bridge
[
{
# 使用的 docker network 名稱為 "bridge"
"Name": "bridge",
"Id": "a1c7b6f8038999f034b8e64ae66885fa8094a020a306ce4f5b5692d7230890b0",
"Created": "2018-07-09T01:23:03.98371109Z",
"Scope": "local",
# 使用的 driver 為 bridge
"Driver": "bridge",
"EnableIPv6": false,
"IPAM": {
"Driver": "default",
"Options": null,
"Config": [
{
"Subnet": "172.17.0.0/16",
"Gateway": "172.17.0.1"
}
]
},
"Internal": false,
"Attachable": false,
"Ingress": false,
"ConfigFrom": {
"Network": ""
},
"ConfigOnly": false,
"Containers": {
# 此為 alpine2 所使用的網路 (對應到上面的 container ID)
"16aa4a102b14de3e151cb5e19522925bb4e143034d5b2aac4ce239c79716b703": {
"Name": "alpine2",
"EndpointID": "4dc3947583ece828dd4371351501e7d0ba9fa149ac5373ea4ddb9466d333b85d",
"MacAddress": "02:42:ac:11:00:03",
"IPv4Address": "172.17.0.3/16",
"IPv6Address": ""
},
# 此為 alpine1 所使用的網路 (對應到上面的 container ID)
"b75464efd30bf09e118450de2abaeb35549e732bac5805671f1e6e97cd970897": {
"Name": "alpine1",
"EndpointID": "ea0138a2c51812f3f142db086e1690f6696e36ff972c826727be30e3c8b8cb41",
"MacAddress": "02:42:ac:11:00:02",
"IPv4Address": "172.17.0.2/16",
"IPv6Address": ""
}
},
"Options": {
"com.docker.network.bridge.default_bridge": "true",
"com.docker.network.bridge.enable_icc": "true",
"com.docker.network.bridge.enable_ip_masquerade": "true",
"com.docker.network.bridge.host_binding_ipv4": "0.0.0.0",
# 使用的 bridge 名稱
"com.docker.network.bridge.name": "docker0",
"com.docker.network.driver.mtu": "1500"
},
"Labels": {}
}
]

而目前的網路架構變成如下:

docker bridge network

測試 container 網路

了解上面的網路架構之後,接著來測試 container 網路:

1
2
3
4
5
6
7
8
9
10
11
12
13
14
15
16
17
18
19
20
21
22
23
24
25
26
27
28
# 檢視 container IP
$ docker exec -it alpine1 ip addr show
1: lo: <LOOPBACK,UP,LOWER_UP> mtu 65536 qdisc noqueue state UNKNOWN qlen 1000
link/loopback 00:00:00:00:00:00 brd 00:00:00:00:00:00
inet 127.0.0.1/8 scope host lo
valid_lft forever preferred_lft forever
6: eth0@if7: <BROADCAST,MULTICAST,UP,LOWER_UP,M-DOWN> mtu 1500 qdisc noqueue state UP
link/ether 02:42:ac:11:00:02 brd ff:ff:ff:ff:ff:ff
inet 172.17.0.2/16 brd 172.17.255.255 scope global eth0
valid_lft forever preferred_lft forever

# 測試連外
$ docker exec -it alpine1 ping -c 3 www.google.com
PING www.google.com (216.58.200.228): 56 data bytes
64 bytes from 216.58.200.228: seq=0 ttl=54 time=2.112 ms
64 bytes from 216.58.200.228: seq=1 ttl=54 time=2.166 ms
64 bytes from 216.58.200.228: seq=2 ttl=54 time=2.417 ms

# 測試連線到另外一個 container (使用 IP)
$ docker exec -it alpine1 ping -c 3 172.17.0.3
PING 172.17.0.3 (172.17.0.3): 56 data bytes
64 bytes from 172.17.0.3: seq=0 ttl=64 time=0.121 ms
64 bytes from 172.17.0.3: seq=1 ttl=64 time=0.071 ms
64 bytes from 172.17.0.3: seq=2 ttl=64 time=0.068 ms

# 測試連線到另外一個 container (使用 domain name) => 不通
$ docker exec -it alpine1 ping -c 3 alpine2
ping: bad address 'alpine2'

從上面的測試可以看出,其實兩個 container 由於使用相同的 bridge(docker0) 因此 IP 可以互通,但使用 domain name 卻無法,表示互相不認識對方。

使用自訂的 Bridge Network

自訂 docker network

這次同樣是使用 bridge driver,但透過 docker network create 指令建立一個自訂名稱的 docker network,這邊取名為 alpine-net

1
2
3
4
5
6
7
8
9
10
11
12
13
14
15
16
17
18
19
20
21
22
23
24
25
26
27
28
29
30
31
32
33
34
35
36
37
38
39
40
41
42
43
44
45
46
47
48
49
50
51
52
53
54
55
56
57
$ docker network create --driver bridge alpine-net
2575acac8e781004cb0dc5c5b020c0252a4bc4cdf18dfc661fe3ffcde30fd0b2

$ docker network ls
NETWORK ID NAME DRIVER SCOPE
2575acac8e78 alpine-net bridge local
a1c7b6f80389 bridge bridge local
dc2f51e1056f host host local
f28460d3a620 none null local

$ docker network inspect alpine-net
[
{
# docker bridge network 名稱改變了
"Name": "alpine-net",
# 此 ID 會對應到新產生的 bridge
"Id": "2575acac8e781004cb0dc5c5b020c0252a4bc4cdf18dfc661fe3ffcde30fd0b2",
"Created": "2018-07-09T03:05:05.505539609Z",
"Scope": "local",
"Driver": "bridge",
"EnableIPv6": false,
"IPAM": {
"Driver": "default",
"Options": {},
"Config": [
{
"Subnet": "172.18.0.0/16",
"Gateway": "172.18.0.1"
}
]
},
"Internal": false,
"Attachable": false,
"Ingress": false,
"ConfigFrom": {
"Network": ""
},
"ConfigOnly": false,
"Containers": {},
"Options": {},
"Labels": {}
}
]

# 新增了一個 software bridge
$ brctl show
bridge name bridge id STP enabled interfaces
br-2575acac8e78 8000.0242a2569c8d no
docker0 8000.024284431eec no

# 此 bridge 所使用的網段為 172.18.0.1/16,跟 docker0 的不同
$ ip a
.... (略)
14: br-2575acac8e78: <NO-CARRIER,BROADCAST,MULTICAST,UP> mtu 1500 qdisc noqueue state DOWN group default
link/ether 02:42:a2:56:9c:8d brd ff:ff:ff:ff:ff:ff
inet 172.18.0.1/16 brd 172.18.255.255 scope global br-2575acac8e78
valid_lft forever preferred_lft forever

從上面的結果看的出來,新建立的 docker network(alpine-net) 會被分配使用另一個不同的網段,與原先的 docker0 使用的並不相同。

建立 container

這裡一共要建立4個 container,分別是 alpine1alpine2alpine3alpine4,並進行以下的網路設定:

Container Docker Network
alpine1 alpine-net
alpine2 alpine-net
alpine3 docker0
alpine4 alpine-net + docker0

並透過以下指令來完成:

1
2
3
4
5
6
7
8
9
10
11
12
13
14
15
16
17
18
# 啟用 container,使用 alpine-net
$ docker run -dit --name alpine1 --network alpine-net alpine ash
010ba5c3e71a723f8c980bb00bb87c97bc41b073163415705006ce5d0071e97c

# 啟用 container,使用 alpine-net
$ docker run -dit --name alpine2 --network alpine-net alpine ash
aecb66274c3b3ec9109ff4eaa582ad4708ed871428d3b4894f9d04330aabcbc4

# 啟用 container,使用 default bridge docker0
$ docker run -dit --name alpine3 alpine ash
3c602d26fcdcc8c0145d4d2d159b20b5b760c1b74393c7b5f7be060f4f8822ac

# 啟用 container,使用 alpine-net
$ docker run -dit --name alpine4 --network alpine-net alpine ash
83133e6103d63513116e0fb791efea64b016424ca73357ba3fed41b7ea92df95

# 額外將 alpine4 網路在與 default bridge docker0 接上
$ docker network connect bridge alpine4

接著確認一下相關的網路設定是不是都有被正確建立:

1
2
3
4
5
6
7
8
9
10
11
12
13
14
15
16
17
18
19
20
21
22
23
24
25
26
27
28
29
30
31
32
33
34
35
36
37
38
39
40
41
42
43
44
45
46
47
48
49
50
51
52
53
54
55
56
57
58
59
60
61
62
63
64
65
66
67
68
69
70
71
72
73
74
75
76
77
78
79
80
81
82
83
84
85
86
87
88
89
90
91
92
93
94
95
96
97
98
99
100
101
102
103
104
105
106
107
108
109
110
111
112
113
114
115
116
117
118
119
120
121
122
123
124
125
126
127
# 檢視 veth device
$ brctl show
bridge name bridge id STP enabled interfaces
br-2575acac8e78 8000.0242a2569c8d no veth19aee42
veth403e609
veth439dc39
docker0 8000.024284431eec no veth1c78e99
veth9857cc8

# 檢視 docker bridge - bridge(docker0)
$ docker network inspect bridge
[
{
# docker network 名稱
"Name": "bridge",
"Id": "a1c7b6f8038999f034b8e64ae66885fa8094a020a306ce4f5b5692d7230890b0",
"Created": "2018-07-09T01:23:03.98371109Z",
"Scope": "local",
# 使用的 driver 為 bridge
"Driver": "bridge",
"EnableIPv6": false,
"IPAM": {
"Driver": "default",
"Options": null,
"Config": [
{
"Subnet": "172.17.0.0/16",
"Gateway": "172.17.0.1"
}
]
},
"Internal": false,
"Attachable": false,
"Ingress": false,
"ConfigFrom": {
"Network": ""
},
"ConfigOnly": false,
"Containers": {
# 此為 alpine3 所使用的網路 (對應到上面的 container ID)
"3c602d26fcdcc8c0145d4d2d159b20b5b760c1b74393c7b5f7be060f4f8822ac": {
"Name": "alpine3",
"EndpointID": "7bd6ae1d8a28a554f57f9937953716cc5f62ea8bd669fc744d3aeffacf05f3c1",
"MacAddress": "02:42:ac:11:00:02",
"IPv4Address": "172.17.0.2/16",
"IPv6Address": ""
},
# 此為 alpine4 所使用的網路 (對應到上面的 container ID)
"83133e6103d63513116e0fb791efea64b016424ca73357ba3fed41b7ea92df95": {
"Name": "alpine4",
"EndpointID": "2bb63005cf4bcb037d644ab230023e65e8ee9e00cf4d98b3fcf9526c14790492",
"MacAddress": "02:42:ac:11:00:03",
"IPv4Address": "172.17.0.3/16",
"IPv6Address": ""
}
},
"Options": {
"com.docker.network.bridge.default_bridge": "true",
"com.docker.network.bridge.enable_icc": "true",
"com.docker.network.bridge.enable_ip_masquerade": "true",
"com.docker.network.bridge.host_binding_ipv4": "0.0.0.0",
"com.docker.network.bridge.name": "docker0",
"com.docker.network.driver.mtu": "1500"
},
"Labels": {}
}
]

# 檢視 docker bridge - alpine-net
$ docker network inspect alpine-net
[
{
# docker network 名稱
"Name": "alpine-net",
"Id": "2575acac8e781004cb0dc5c5b020c0252a4bc4cdf18dfc661fe3ffcde30fd0b2",
"Created": "2018-07-09T03:05:05.505539609Z",
"Scope": "local",
# 使用的 driver 為 bridge
"Driver": "bridge",
"EnableIPv6": false,
"IPAM": {
"Driver": "default",
"Options": {},
"Config": [
{
"Subnet": "172.18.0.0/16",
"Gateway": "172.18.0.1"
}
]
},
"Internal": false,
"Attachable": false,
"Ingress": false,
"ConfigFrom": {
"Network": ""
},
"ConfigOnly": false,
"Containers": {
# 此為 alpine1 所使用的網路 (對應到上面的 container ID)
"010ba5c3e71a723f8c980bb00bb87c97bc41b073163415705006ce5d0071e97c": {
"Name": "alpine1",
"EndpointID": "f1357dd263dea947c4cd203fd8031be40fae4840f6994dd5e11d6790a038569c",
"MacAddress": "02:42:ac:12:00:02",
"IPv4Address": "172.18.0.2/16",
"IPv6Address": ""
},
# 此為 alpine4 所使用的網路 (對應到上面的 container ID)
"83133e6103d63513116e0fb791efea64b016424ca73357ba3fed41b7ea92df95": {
"Name": "alpine4",
"EndpointID": "cf6bb33270eca6d40d4d953cea49302d210bc8ba995f04cdcf138344d5378d2f",
"MacAddress": "02:42:ac:12:00:04",
"IPv4Address": "172.18.0.4/16",
"IPv6Address": ""
},
# 此為 alpine2 所使用的網路 (對應到上面的 container ID)
"aecb66274c3b3ec9109ff4eaa582ad4708ed871428d3b4894f9d04330aabcbc4": {
"Name": "alpine2",
"EndpointID": "28a237e9fe55f133459140c9e5265470e34baeec43c2c0f6c32d5d539b694403",
"MacAddress": "02:42:ac:12:00:03",
"IPv4Address": "172.18.0.3/16",
"IPv6Address": ""
}
},
"Options": {},
"Labels": {}
}
]

由於 alpine4 特別與兩個 network 連接,因此來檢視一下 alpine4 的網路狀況:

1
2
3
4
5
6
7
8
9
10
11
# 從下面的輸出可以看出,由於 alpine4 接到了兩個 software bridge,因此會有兩張網卡顯示出來
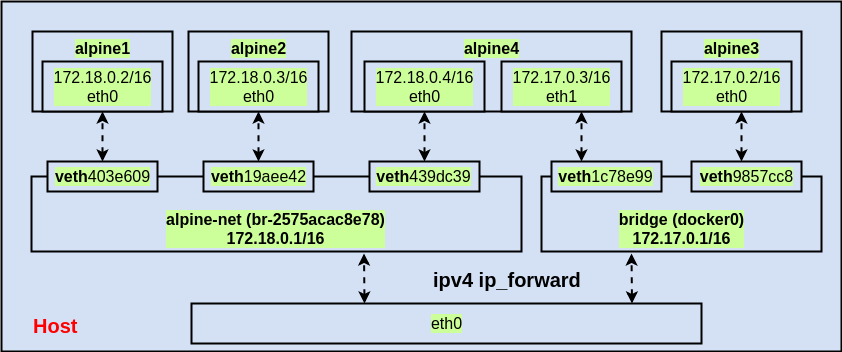
$ docker exec -it alpine4 ip a
..... (略)
21: eth0@if22: <BROADCAST,MULTICAST,UP,LOWER_UP,M-DOWN> mtu 1500 qdisc noqueue state UP
link/ether 02:42:ac:12:00:04 brd ff:ff:ff:ff:ff:ff
inet 172.18.0.4/16 brd 172.18.255.255 scope global eth0
valid_lft forever preferred_lft forever
23: eth1@if24: <BROADCAST,MULTICAST,UP,LOWER_UP,M-DOWN> mtu 1500 qdisc noqueue state UP
link/ether 02:42:ac:11:00:03 brd ff:ff:ff:ff:ff:ff
inet 172.17.0.3/16 brd 172.17.255.255 scope global eth1
valid_lft forever preferred_lft forever

而目前的網路架構變成如下圖:

customize docker bridge network

測試 container 網路

最後要來測試一下 container 之間的連通性:

1
2
3
4
5
6
7
8
9
10
11
12
13
14
15
16
17
18
19
20
21
22
23
24
25
26
27
28
29
30
31
32
33
34
35
36
37
38
39
40
41
42
43
44
45
46
47
48
49
50
# 測試與 alpine2 通訊
$ docker exec -it alpine1 ping -c 2 alpine2
PING alpine2 (172.18.0.3): 56 data bytes
64 bytes from 172.18.0.3: seq=0 ttl=64 time=0.095 ms
64 bytes from 172.18.0.3: seq=1 ttl=64 time=0.076 ms

--- alpine2 ping statistics ---
2 packets transmitted, 2 packets received, 0% packet loss
round-trip min/avg/max = 0.076/0.085/0.095 ms

# 測試與 alpine4 通訊
$ docker exec -it alpine1 ping -c 2 alpine4
PING alpine4 (172.18.0.4): 56 data bytes
64 bytes from 172.18.0.4: seq=0 ttl=64 time=0.145 ms
64 bytes from 172.18.0.4: seq=1 ttl=64 time=0.102 ms

--- alpine4 ping statistics ---
2 packets transmitted, 2 packets received, 0% packet loss
round-trip min/avg/max = 0.102/0.123/0.145 ms

# 測試與 alpine3 通訊
$ docker exec -it alpine1 ping -c 2 alpine3
ping: bad address 'alpine3'

# 以 IP 的方式測試與 alpine3 通訊
$ docker exec -it alpine1 ping -c 2 172.17.0.2
PING 172.17.0.2 (172.17.0.2): 56 data bytes

--- 172.17.0.2 ping statistics ---
2 packets transmitted, 0 packets received, 100% packet loss

# 測試與 alpine1(自己) 通訊
$ docker exec -it alpine1 ping -c 2 alpine1
PING alpine1 (172.18.0.2): 56 data bytes
64 bytes from 172.18.0.2: seq=0 ttl=64 time=0.052 ms
64 bytes from 172.18.0.2: seq=1 ttl=64 time=0.079 ms

--- alpine1 ping statistics ---
2 packets transmitted, 2 packets received, 0% packet loss
round-trip min/avg/max = 0.052/0.065/0.079 ms

# 測試連外能力
$ docker exec -it alpine1 ping -c 2 www.google.com
PING www.google.com (172.217.160.68): 56 data bytes
64 bytes from 172.217.160.68: seq=0 ttl=53 time=7.252 ms
64 bytes from 172.217.160.68: seq=1 ttl=53 time=7.329 ms

--- www.google.com ping statistics ---
2 packets transmitted, 2 packets received, 0% packet loss
round-trip min/avg/max = 7.252/7.290/7.329 ms

從上面的測試可以得出以下結論:

  1. 在自訂的 docker network 中,container 可以透過 domain name 的方式與其他在同一個 docker network 下的 container 通訊

  2. 不同 docker network 之間的 container 網路是隔離無法相互通訊的,不論是透過 domain name or IP

第一個結論是因為 docker 對於自訂的 docker network 會提供 automatic service discovery 的功能,讓 container 之間可以透過 name 來與對方通訊

另外,若是在同時與 docker0alpine-net 兩個 software bridge 相接的 alpine4 container 上執行測試會是什麼結果呢?

1
2
3
4
5
6
7
8
9
10
11
12
13
14
15
16
17
18
19
20
21
22
23
24
25
26
27
28
29
30
31
32
33
# 可透過 name 與 alpine-net bridge 下的 container(alpine1) 通訊 
$ docker exec -it alpine4 ping -c 2 alpine1
PING alpine1 (172.18.0.2): 56 data bytes
64 bytes from 172.18.0.2: seq=0 ttl=64 time=0.093 ms
64 bytes from 172.18.0.2: seq=1 ttl=64 time=0.077 ms

--- alpine1 ping statistics ---
2 packets transmitted, 2 packets received, 0% packet loss
round-trip min/avg/max = 0.077/0.085/0.093 ms

# 無法透過 name 與 docker0 bridge 下的 container(alpine3) 通訊
$ docker exec -it alpine4 ping -c 2 alpine3
ping: bad address 'alpine3'

# 但還是可透過 IP 與 docker0 bridge 下的 container(alpine3) 通訊
$ docker exec -it alpine4 ping -c 2 172.17.0.2
PING 172.17.0.2 (172.17.0.2): 56 data bytes
64 bytes from 172.17.0.2: seq=0 ttl=64 time=0.140 ms
64 bytes from 172.17.0.2: seq=1 ttl=64 time=0.092 ms

--- 172.17.0.2 ping statistics ---
2 packets transmitted, 2 packets received, 0% packet loss
round-trip min/avg/max = 0.092/0.116/0.140 ms

# 測試連外能力
$ docker exec -it alpine4 ping -c 2 www.google.com
PING www.google.com (172.217.160.68): 56 data bytes
64 bytes from 172.217.160.68: seq=0 ttl=53 time=7.429 ms
64 bytes from 172.217.160.68: seq=1 ttl=53 time=7.361 ms

--- www.google.com ping statistics ---
2 packets transmitted, 2 packets received, 0% packet loss
round-trip min/avg/max = 7.361/7.395/7.429 ms

從 alpine4 上的測試可以發現以下結論:

  1. docker0 bridge 下的 container,都無法透過 domain name 相互溝通

  2. 承上,使用 IP 通訊是沒問題的

有了以下測試結果,若要使用 domain name 處理 container 之間的通訊時,就記得必須建立一個新的 docker network 來處理才可以正常通訊。

References