注意事項
要透過 @botfather 來新增 bot(使用 /newbot 命令)
要讓 bot 可以在 group 裡面可以回應,要透過 /mybots -> 選擇 bot -> Bot Settings -> Group Privacy -> 按下 Turn Off(畫面顯示 Privacy mode is disabled for xxxx 就表示啟用了)
開啟 bot inline query 功能,要透過 /mybots -> 選擇 bot -> Bot Settings -> Inline Mode -> 按下 Turn on(畫面顯示 Inline mode is currently enabled for xxxx 就表示啟用了)
要設定 bot 使用提示功能,要透過 /mybots -> 選擇 bot -> Bot Settings -> Inline Mode -> 按下 Edit inline placeholder,輸入使用提示即可 (例如:<type> <search query>)
安裝 nodemon(安裝方法 npm install nodemon -g),當程式修改完後儲存,系統就會自動重新協助啟動程式
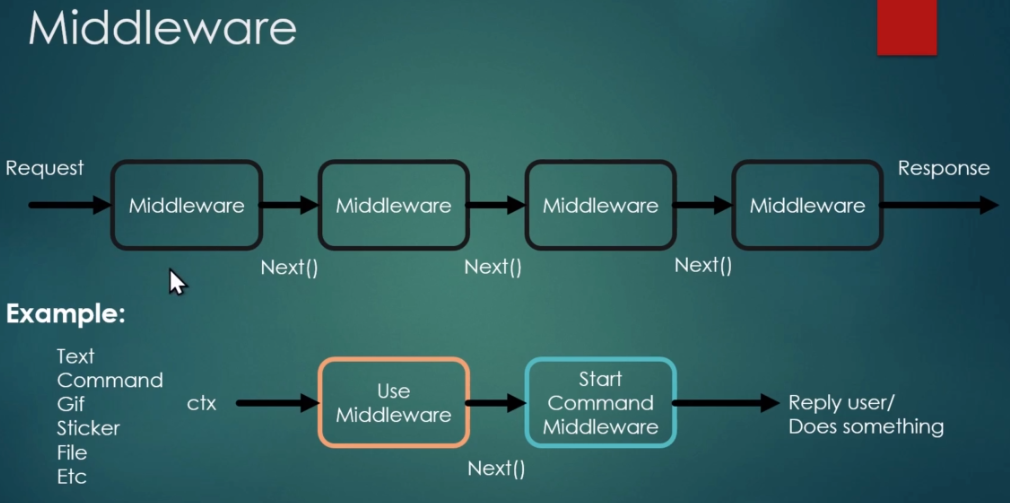
基本觀念 use 所有 bot 收到的命令都會經過 use
1
2
3
bot.use((ctx) => { ctx.reply("You used the bot"); });
middleware 先搞清楚什麼是 middleware ,簡單範例如下:
1
2
3
4
5
6
7
8
9
10
11
12
13
14
const bot = new Telegraf(process.env.BOT_TOKEN) //這是一個 middleware bot.use(async (ctx, next) => { const start = new Date() await next() const ms = new Date() - start console.log('Response time: %sms', ms) }) //這是另一個 middleware bot.on('text', (ctx) => ctx.reply('Hello World')) bot.launch()
state 要在不同的 middleware 之間共享訊息,不需要靠全域變數,透過 [State](https://telegraf.js.org/#/?id=state) 就可以搞定
context shortcut 透過 context shortcut,可以不用繞一大圈用 telegram API,省略帶入 chatid 的部份
1
2
3
4
5
bot.command('start', ctx => { ctx.reply("Hello World"); bot.telegram.sendMessage(ctx.chat.id, "Hello World"); });
Echo Bot help command 若要提供給使用者一個 command 的清單可供參考,可以透過 helper command 的方式
1
2
3
4
5
6
7
8
9
10
11
12
13
14
const helpMessage = ` Say something to me /start - start the bot /help - command reference `; bot.start((ctx) => { ctx.reply("Hi, I am Echo bot!"); ctx.reply(helpMessage); }); bot.help((ctx) => { ctx.reply(helpMessage); });
echo telegraf 套件中並沒有對使用者輸入進行額外處理,所以要處理較為複雜的 command,就必須要自己開發相關邏輯
1
2
3
4
5
6
7
8
9
10
11
12
13
14
15
bot.command("echo", (ctx) => { let input = ctx.message.text; let inputArray = input.split(" "); console.log(inputArray); let message = ""; if(inputArray.length == 1) { message = "You said /echo"; } else { inputArray.shift(); message = inputArray.join(" "); } ctx.reply(message); });
Logging 透過 use(所有的 command 都會經過 use middleware) 可以設計出 logging 的機制,讓使用者所有的 command 都會發到另外一個 group channel 做紀錄
1
2
3
4
5
6
7
8
9
10
11
bot.use((ctx, next) => { //可在 group channel 中傳訊息,並從 ctx.chat.id 中取得 chatid if(ctx.updateSubTypes[0] == "text") { bot.telegram.sendMessage(-325114827, ctx.from.username + " said " + ctx.message.text); } else { bot.telegram.sendMessage(-325114827, ctx.from.username + " sent " + ctx.updateSubTypes[0]); } //完成 log 功能後,繼續將 context 往下傳給其他 middleware next(); });
傳送檔案 在範例中會以傳送圖片來進行說明,以下說明幾個重點:
Telegram 物件(來自於 (new Telegraf()).telegram)傳送物件是透過 sendPhoto 方法來完成
在 telegraf 中處理 file 的方式有五種(官網說明 )
在 sendPhoto 中的 File type,就是上述的五種方法其中之一
1
2
3
4
5
6
7
8
9
10
11
12
13
bot.command("test", ctx => { bot.telegram.sendPhoto(ctx.chat.id, "https://pgw.udn.com.tw/gw/photo.php?u=https://uc.udn.com.tw/photo/2019/11/27/99/7117740.jpg&x=0&y=0&sw=0&sh=0&sl=W&fw=1050"); //file path bot.telegram.sendPhoto(ctx.chat.id, { source: "res/london.jpg" }); //file id //這個部份可透過 "on" middleware,並自行上傳圖片後,透過 ctx.message.photo.file_id 取得正確的 file id //並在 sendPhoto 中作為第二個參數使用 //(每一張上傳到 telegram 的圖片都會有獨一無二的 file id) });
針對使用者訊息進行回覆 這個部份需要透過 ctx.message.message_id 取得使用者訊息的 ID 並進行回覆
1
2
3
4
5
6
7
bot.command("newyork", ctx => { bot.telegram.sendPhoto(ctx.chat.id, { source: "res/newyork.jpg" }, { reply_to_message_id: ctx.message.message_id }); });
chat action 透過 chat action 可以在 telegram 的界面上告知使用者目前 bot 正在進行的動作,可視為是一種狀態資訊。
訊息只會五秒或是更短,一旦訊息成功送給使用者後,chat action 的訊息就會消失
1
2
3
bot.command("newyork", ctx => { bot.telegram.sendChatAction(ctx.chat.id, "upload_photo"); });
傳送多張圖片 要同時傳送多張圖片可透過 [sendMediaGroup](https://telegraf.js.org/#/?id=sendmediagroup) 方法,並將圖片以 array 的形式傳入。
1
2
3
4
5
6
7
8
9
10
bot.command("cities", ctx => { let cities = ['res/dubai.jpg', 'res/hongkong.jpg', 'res/london.jpg', 'res/newyork.jpg', 'res/singapore.jpg'] let result = cities.map(city => { return { type: 'photo', media: { source: city } } }); bot.telegram.sendMediaGroup(ctx.chat.id, result); });
傳送文件 傳送文件可以同時加上縮圖。
1
2
3
4
5
6
7
bot.command("citieslist", ctx => { bot.telegram.sendDocument(ctx.chat.id, { source: "res/citieslist.txt" }, { thumb: { source: "res/dubai.jpg" } }); });
互動式鍵盤 產生 inline keyboard 要使用 telegram keyboard 功能,就必須要使用 sendMessage 而非單純的 reply(沒有 keyboard 的參數可用) 來產生
1
2
3
4
5
6
7
8
9
10
11
12
13
14
15
bot.command("test", ctx => { ctx.telegram.sendMessage(ctx.chat.id, 'Welcome', { reply_markup: { inline_keyboard: [ [ { text: "one", callback_data: 'one' }, { text: "one", callback_data: 'one' } ], [ { text: "one", callback_data: 'one' } ] ] } }); });
點選 keyboard 後進行回應 回應 keyboard event 必須使用 action 方法,並根據在 keyboard 中設定的 callback data 來設定處理的邏輯
1
2
3
4
5
6
7
8
9
10
11
12
13
14
15
16
17
bot.command("test", ctx => { ctx.telegram.sendMessage(ctx.chat.id, 'Welcome', { reply_markup: { inline_keyboard: [ [ { text: "Click me", callback_data: 'one' } ], ] } }); }); bot.action('one', ctx => { // 透過 answerCbQuery 可以用來回應處理邏輯已經完成 ctx.answerCbQuery('Job has done!'); ctx.reply("You clicked the button"); });
來回選單的開發 若要開發來回選單的效果,建議透過刪除 message 的方式來進行
1
2
3
4
5
6
7
8
9
10
11
12
13
14
15
16
17
18
19
20
21
22
23
24
25
26
27
28
29
30
31
32
33
34
35
36
37
38
39
40
41
42
43
bot.command("test", ctx => { ctx.telegram.sendMessage(ctx.chat.id, 'Main Menu', { reply_markup: { inline_keyboard: [ [ { text: "See Fruits List", callback_data: 'fruits' } ], [ { text: "See Meats List", callback_data: 'meats' } ] ] } }); }); bot.action('fruits', ctx => { ctx.deleteMessage(); ctx.telegram.sendMessage(ctx.chat.id, 'List of fruits:\n- Apples\n- Oranges\n- Pears', { reply_markup: { inline_keyboard: [ [ { text: "Back to menu", callback_data: 'menu' } ] ] } }); }); bot.action('menu', ctx => { ctx.deleteMessage(); ctx.telegram.sendMessage(ctx.chat.id, 'Main Menu', { reply_markup: { inline_keyboard: [ [ { text: "See Fruits List", callback_data: 'fruits' } ], [ { text: "See Meats List", callback_data: 'meats' } ] ] } }); });
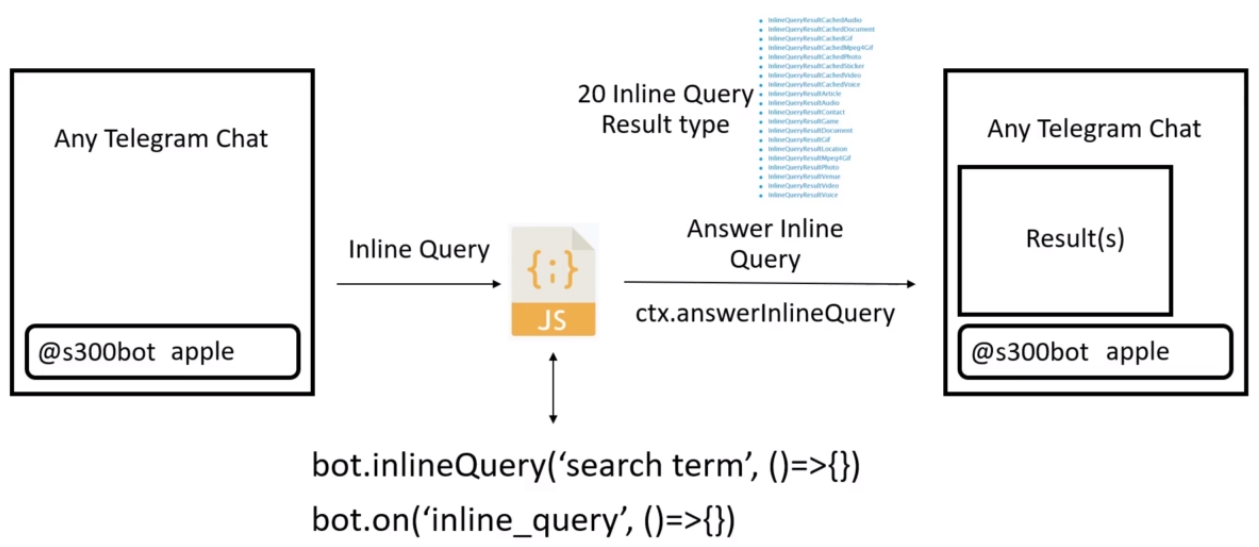
Inline Query 原理 & 流程說明 以下透過 Telegram Inline Query Flow 來說明整體開發流程:
首先使用者可以在 telegram 界面中透過 @bot [search term] 的方式觸發 inline query。
接著 inline query 會被送到 bot 端的程式(這個部份就是自己開發的 bot code)進行處理,若是透過 [nodejs telegraf][https://telegraf.js.org/] 套件,則以透過 context.inlineQuery('search_term', ()=>{}) or context.on('inline_query', ()=>{}) 來進行處理。
其中 on 是 middleware ,inline_query 則是 update type
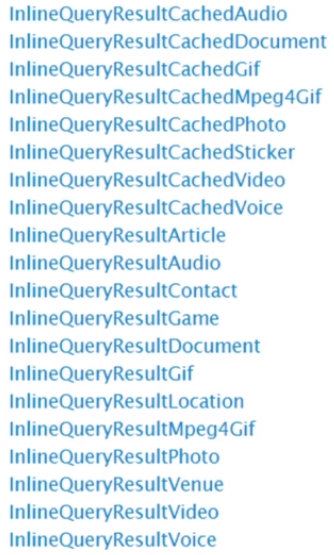
最後開發者可以根據攔截到的訊息,經過處理之後,回應 Inline Query Result ,而在 telegram 中可使用多達 20 種的 Inline Query Result:
需要注意的是,一般透過 @botfather 新增的 bot 預設是不會啟動 Inline Query Mode,必須在 Bot Settings 中開啟才行。
搜尋範例 以 InlineQueryResultCachedPhoto 回應 inline query 範例:
1
2
3
4
5
6
7
8
9
10
11
12
13
14
15
16
17
18
19
20
21
22
23
24
25
26
//使用 middleware "on" + update type "inline_query" 來攔截事件 bot.on('inline_query', async ctx => { //透過 context 的 inlineQuery.query 可以取得使用者輸入的資料 let query = ctx.inlineQuery.query; //以下則是呼叫 pixabay API 的範例 let res = await axios.get(`https://pixabay.com/api/?key=${apikey}&q=${query}`); let data = res.data.hits; //type='photo' 表示回應 InlineQueryResultCachedPhoto //回應內容可以用 markdown 的格式回應 let results = data.map((item, index) => { return { type: 'photo', id: String(index), photo_url: item.webformatURL, thumb_url: item.previewURL, photo_width: 300, photo_height: 200, caption: `[Source](${item.webformatURL})\n[Large Iamge](${item.largeImageURL})`, parse_mode: 'Markdown' }; }); //透過 context 的 answerInlineQuery 可以直接回應 inline query 而不需要帶上 query id 參數 ctx.answerInlineQuery(results); });
以 InlineQueryResultArticle 回應 inline query 範例:
1
2
3
4
5
6
7
8
9
10
11
12
13
14
15
16
17
18
19
20
21
22
23
24
25
26
bot.on('inline_query', async ctx => { let query = ctx.inlineQuery.query; let res = await axios.get(`https://en.wikipedia.org/w/api.php?action=opensearch&format=json&search=${query}&limit=5`); let data = res.data; let allTitles = data[1]; let allLinks = data[3]; if(allTitles == undefined) { return; } let results = allTitles.map((item, index) => { return { type: 'article', id: String(index), title: item, input_message_content: { message_text: `${item}\n${allLinks[index]}` }, description: allLinks[index] }; }); ctx.answerInlineQuery(results); });
透過 switch_inline_query_current_chat 提供 template command 為了方便使用者,可以透過按鈕的方式進行動作而非純敲鍵盤的方式,可以使用 callback function 中,使用 reply_markup + inline_keyboard + switch_inline_query_current_chat 來達成此目的,以下是個簡單範例:
1
2
3
4
5
6
7
8
9
10
11
12
13
14
15
16
17
18
19
20
21
22
23
//使用者輸入 /start 或是 /help 之後,就會出現兩個搜尋按鈕 bot.command(['start', 'help'], ctx => { let message = ` Welcome to Search Bot! Use the inline mode below @godleon_test_bot p <search image> @godleon_test_bot w <search wiki> `; //按下第一個按鈕,會自動在使用者的訊息輸入欄中填入 "@bot_id p" //按下第一個按鈕,會自動在使用者的訊息輸入欄中填入 "@bot_id w" ctx.reply(message, { reply_markup: { inline_keyboard: [ [ { text: 'Search Pixabay Image', switch_inline_query_current_chat: 'p ' } ], [ { text: 'Search Wiki', switch_inline_query_current_chat: 'w ' } ] ] } }); });
Polling Mode v.s. Webhook Polling Mode 當一個 telegram bot 被建立時,預設設定使用的是 polling mode,而此模式的行為如下:
bot 程式會不斷的去詢問 telegram server 目前有沒有新的訊息
若是沒有新訊息,telegram server 則回應沒有,bot 程式也就不會做任何事情
一旦使用者輸入訊息,下次 bot 程式來詢問時,telegram server 就會回應該訊息
bot 程式收到新的訊息,進行處理
而 polling mode 有以下幾個優點:
但是從上面的流程看來,polling mode 的缺點也顯而易見,這其實蠻浪費資源的,會對 telegram server 產生很多詢問的 polling ,整體來說並不是一個有效率的資源使用方法。
Webhook 然而上面的問題可以改用 webhook 來解決,而 webhook 模式行為就很簡單:
bot 不會主動去問 telegram server 任何訊息
當 telegram server 收到訊息後,主動通知 bot
bot 收到訊息後進行處理
可以看出上面的流程比起 polling mode 有相當大的改善,但使用 webhook 需要提供一個 telegram server 可以存取到的 public URL,但這個部份也不難,可以考慮以下項目:
AWS API Gateway
若是 bot 程式需要取用外部公有資源(例如上面範例的 pixabay & wiki),那就適合放在這裡
ngrok
若是要存取的資源都在內部,那就用這個吧(ngrok 可以提供一個 public URL,並從 ngrok server 建立一個 network tunnel 到內部程式),對於開發者開發也方便
而開啟 bot wehbook mode ,則是要使用以下 template URL 來完成:
https://api.telegram.org/bot /setWebhook?url=
假如設定如下:
那設定 telegram bot webhook 就可以使用下列網址:
https://api.telegram.org/bot808328592:AAFFUBCK2g7olBWpncLlfsrLh1AQee_sIzk/setWebhook?url=https://3bao3o4fy3.execute-api.us-east-1.amazonaws.com/v1
References